> ## Documentation Index
> Fetch the complete documentation index at: https://docs.neuraltalk.ai/llms.txt
> Use this file to discover all available pages before exploring further.
# 📪 Setting up your AI Assistant
> Complete guide to creating and configuring your AI assistant from scratch
## Overview
This guide will walk you through the complete process of setting up your AI assistant, from initial creation to advanced configuration. Whether you're building a customer support bot, sales assistant, or internal knowledge base, this guide covers everything you need to know.
## Creating Your Assistant
### Step 1: Initial Setup
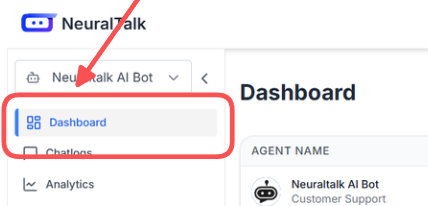
1. **Access the Dashboard**
* Log in to [neuraltalk.ai](https://neuraltalk.ai)
* Click "Create New Assistant" or the "+" button
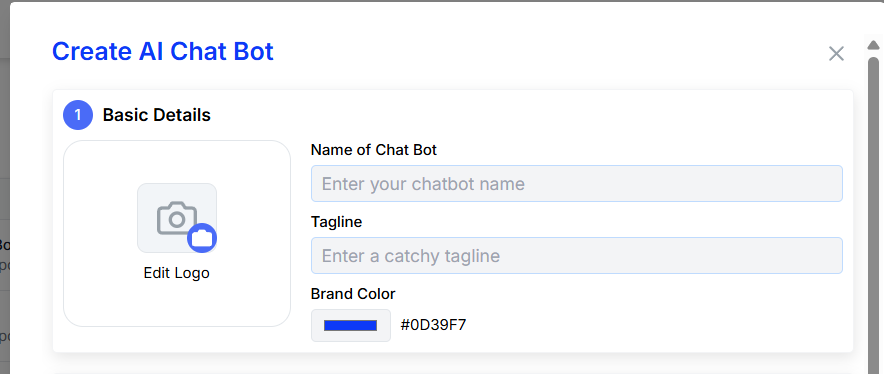
 2. **Basic Information**
* **Assistant Name**: Choose a descriptive name (e.g., "Acme Customer Support")
* **Description**: Brief description of your assistant's purpose
* **Category**: Select the primary use case (Support, Sales, General, etc.)
2. **Basic Information**
* **Assistant Name**: Choose a descriptive name (e.g., "Acme Customer Support")
* **Description**: Brief description of your assistant's purpose
* **Category**: Select the primary use case (Support, Sales, General, etc.)
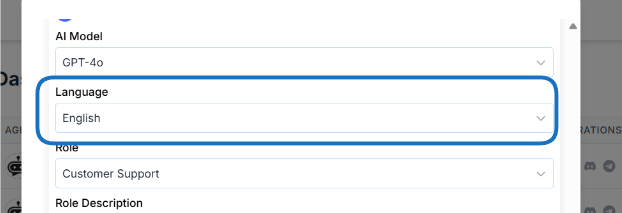
 3. **Language Configuration**
* **Primary Language**: Select the main language for conversations
* **Additional Languages**: Add support for multiple languages if needed
* **Regional Settings**: Configure date, time, and number formats
3. **Language Configuration**
* **Primary Language**: Select the main language for conversations
* **Additional Languages**: Add support for multiple languages if needed
* **Regional Settings**: Configure date, time, and number formats
 ### Step 2: Personality Configuration
Choose how your assistant should communicate:
* **Professional**: Formal, business-appropriate language
* **Friendly**: Warm, approachable, and conversational
* **Casual**: Relaxed, informal communication style
* **Custom**: Define your own personality traits
Configure how detailed responses should be:
* **Concise**: Short, direct answers
* **Detailed**: Comprehensive, thorough responses
* **Adaptive**: Adjusts based on question complexity
Set the interaction pattern:
* **Question-Answer**: Direct responses to specific questions
* **Conversational**: Engages in back-and-forth dialogue
* **Guided**: Leads users through structured flows
## Advanced Configuration
### Greeting and Fallback Messages
1. **Welcome Message**
```text theme={null}
Hi! I'm your AI assistant. How can I help you today?
```
2. **Fallback Messages**
* Configure what to say when the AI doesn't understand
* Set up escalation to human agents
* Define when to ask for clarification
3. **Conversation Starters**
* Add suggested questions or topics
* Help users understand what they can ask
* Guide new users to common use cases
### Knowledge Base Setup
Add your existing content:
* PDF files (manuals, guides, policies)
* Word documents (FAQs, procedures)
* Text files (knowledge articles)
* Web pages (via URL)
Add specific information:
* Frequently asked questions
* Product specifications
* Company policies
* Contact information
Structure your knowledge:
* Create categories and tags
* Set content priorities
* Define access permissions
### AI Model Configuration
Choose the AI model that best fits your needs:
* **GPT-4**: Most capable, best for complex tasks
* **GPT-3.5**: Fast and cost-effective
* **Claude**: Excellent for analysis and reasoning
Provide specific instructions for your assistant:
* Response format preferences
* Brand voice guidelines
* Specific behaviors to avoid
## Integration Settings
### Website Widget Configuration
1. **Visual Customization**
* Choose widget position and size
* Match your brand colors
* Upload your logo
* Select animation preferences
2. **Behavior Settings**
* Set when the widget appears
* Configure auto-open triggers
* Set conversation persistence
* Enable typing indicators
### Platform-Specific Settings
* Configure business profile
* Set up message templates
* Configure webhook endpoints
* Test message delivery
* Set up bot permissions
* Configure slash commands
* Set up channel monitoring
* Configure user authentication
* Generate API keys
* Configure webhooks
* Set up authentication
* Test API endpoints
## Testing and Validation
### Pre-Launch Testing
1. **Conversation Testing**
* Test common questions
* Try edge cases and unusual inputs
* Verify response accuracy
* Check conversation flow
2. **Integration Testing**
* Test on all target platforms
* Verify message delivery
* Check error handling
* Test user authentication
3. **Performance Testing**
* Monitor response times
* Test under load
* Verify scalability
* Check resource usage
### Quality Assurance
* Verify all information is accurate
* Check for outdated content
* Ensure brand consistency
* Validate contact information
* Test from user perspective
* Check mobile responsiveness
* Verify accessibility features
* Test different browsers
* Configure tracking
* Set up conversion goals
* Enable conversation logging
* Set up alerts and notifications
## Launch Checklist
Before going live, ensure you've completed:
* [ ] Assistant name and description configured
* [ ] Personality and tone settings applied
* [ ] Knowledge base populated and organized
* [ ] Greeting and fallback messages set
* [ ] Visual styling matches brand guidelines
* [ ] All integrations tested and working
* [ ] Analytics and tracking configured
* [ ] Team trained on monitoring and management
* [ ] Support processes defined
* [ ] Backup and recovery procedures in place
## Post-Launch Monitoring
### Key Metrics to Track
* Conversation volume
* User satisfaction scores
* Response completion rates
* Time to resolution
* Response accuracy
* Escalation rates
* Error rates
* System uptime
### Continuous Improvement
1. **Regular Reviews**
* Weekly conversation analysis
* Monthly performance reports
* Quarterly strategy reviews
* Annual platform updates
2. **Content Updates**
* Add new FAQs based on user questions
* Update product information
* Refresh policies and procedures
* Remove outdated content
3. **Feature Enhancements**
* Add new integrations
* Implement advanced features
* Optimize conversation flows
* Enhance user experience
## Troubleshooting Common Issues
* Check API key configuration
* Verify model selection
* Review rate limits
* Check network connectivity
* Review knowledge base content
* Check training data quality
* Adjust model parameters
* Add more specific examples
* Verify webhook URLs
* Check authentication tokens
* Review platform permissions
* Test API endpoints
## Next Steps
Now that your assistant is set up, explore these advanced features:
Learn how to effectively train your AI with your knowledge base
Add your assistant to your website with our easy integration
Customize the appearance and behavior of your assistant
Add powerful tools and workflows to extend capabilities
### Step 2: Personality Configuration
Choose how your assistant should communicate:
* **Professional**: Formal, business-appropriate language
* **Friendly**: Warm, approachable, and conversational
* **Casual**: Relaxed, informal communication style
* **Custom**: Define your own personality traits
Configure how detailed responses should be:
* **Concise**: Short, direct answers
* **Detailed**: Comprehensive, thorough responses
* **Adaptive**: Adjusts based on question complexity
Set the interaction pattern:
* **Question-Answer**: Direct responses to specific questions
* **Conversational**: Engages in back-and-forth dialogue
* **Guided**: Leads users through structured flows
## Advanced Configuration
### Greeting and Fallback Messages
1. **Welcome Message**
```text theme={null}
Hi! I'm your AI assistant. How can I help you today?
```
2. **Fallback Messages**
* Configure what to say when the AI doesn't understand
* Set up escalation to human agents
* Define when to ask for clarification
3. **Conversation Starters**
* Add suggested questions or topics
* Help users understand what they can ask
* Guide new users to common use cases
### Knowledge Base Setup
Add your existing content:
* PDF files (manuals, guides, policies)
* Word documents (FAQs, procedures)
* Text files (knowledge articles)
* Web pages (via URL)
Add specific information:
* Frequently asked questions
* Product specifications
* Company policies
* Contact information
Structure your knowledge:
* Create categories and tags
* Set content priorities
* Define access permissions
### AI Model Configuration
Choose the AI model that best fits your needs:
* **GPT-4**: Most capable, best for complex tasks
* **GPT-3.5**: Fast and cost-effective
* **Claude**: Excellent for analysis and reasoning
Provide specific instructions for your assistant:
* Response format preferences
* Brand voice guidelines
* Specific behaviors to avoid
## Integration Settings
### Website Widget Configuration
1. **Visual Customization**
* Choose widget position and size
* Match your brand colors
* Upload your logo
* Select animation preferences
2. **Behavior Settings**
* Set when the widget appears
* Configure auto-open triggers
* Set conversation persistence
* Enable typing indicators
### Platform-Specific Settings
* Configure business profile
* Set up message templates
* Configure webhook endpoints
* Test message delivery
* Set up bot permissions
* Configure slash commands
* Set up channel monitoring
* Configure user authentication
* Generate API keys
* Configure webhooks
* Set up authentication
* Test API endpoints
## Testing and Validation
### Pre-Launch Testing
1. **Conversation Testing**
* Test common questions
* Try edge cases and unusual inputs
* Verify response accuracy
* Check conversation flow
2. **Integration Testing**
* Test on all target platforms
* Verify message delivery
* Check error handling
* Test user authentication
3. **Performance Testing**
* Monitor response times
* Test under load
* Verify scalability
* Check resource usage
### Quality Assurance
* Verify all information is accurate
* Check for outdated content
* Ensure brand consistency
* Validate contact information
* Test from user perspective
* Check mobile responsiveness
* Verify accessibility features
* Test different browsers
* Configure tracking
* Set up conversion goals
* Enable conversation logging
* Set up alerts and notifications
## Launch Checklist
Before going live, ensure you've completed:
* [ ] Assistant name and description configured
* [ ] Personality and tone settings applied
* [ ] Knowledge base populated and organized
* [ ] Greeting and fallback messages set
* [ ] Visual styling matches brand guidelines
* [ ] All integrations tested and working
* [ ] Analytics and tracking configured
* [ ] Team trained on monitoring and management
* [ ] Support processes defined
* [ ] Backup and recovery procedures in place
## Post-Launch Monitoring
### Key Metrics to Track
* Conversation volume
* User satisfaction scores
* Response completion rates
* Time to resolution
* Response accuracy
* Escalation rates
* Error rates
* System uptime
### Continuous Improvement
1. **Regular Reviews**
* Weekly conversation analysis
* Monthly performance reports
* Quarterly strategy reviews
* Annual platform updates
2. **Content Updates**
* Add new FAQs based on user questions
* Update product information
* Refresh policies and procedures
* Remove outdated content
3. **Feature Enhancements**
* Add new integrations
* Implement advanced features
* Optimize conversation flows
* Enhance user experience
## Troubleshooting Common Issues
* Check API key configuration
* Verify model selection
* Review rate limits
* Check network connectivity
* Review knowledge base content
* Check training data quality
* Adjust model parameters
* Add more specific examples
* Verify webhook URLs
* Check authentication tokens
* Review platform permissions
* Test API endpoints
## Next Steps
Now that your assistant is set up, explore these advanced features:
Learn how to effectively train your AI with your knowledge base
Add your assistant to your website with our easy integration
Customize the appearance and behavior of your assistant
Add powerful tools and workflows to extend capabilities