> ## Documentation Index
> Fetch the complete documentation index at: https://docs.neuraltalk.ai/llms.txt
> Use this file to discover all available pages before exploring further.
# 📥 Lead Collection
> Guide to collect visitor information and generate leads through your chatbot
🎥 Refer to the setup video for a step-by-step visual guide:
## Overview
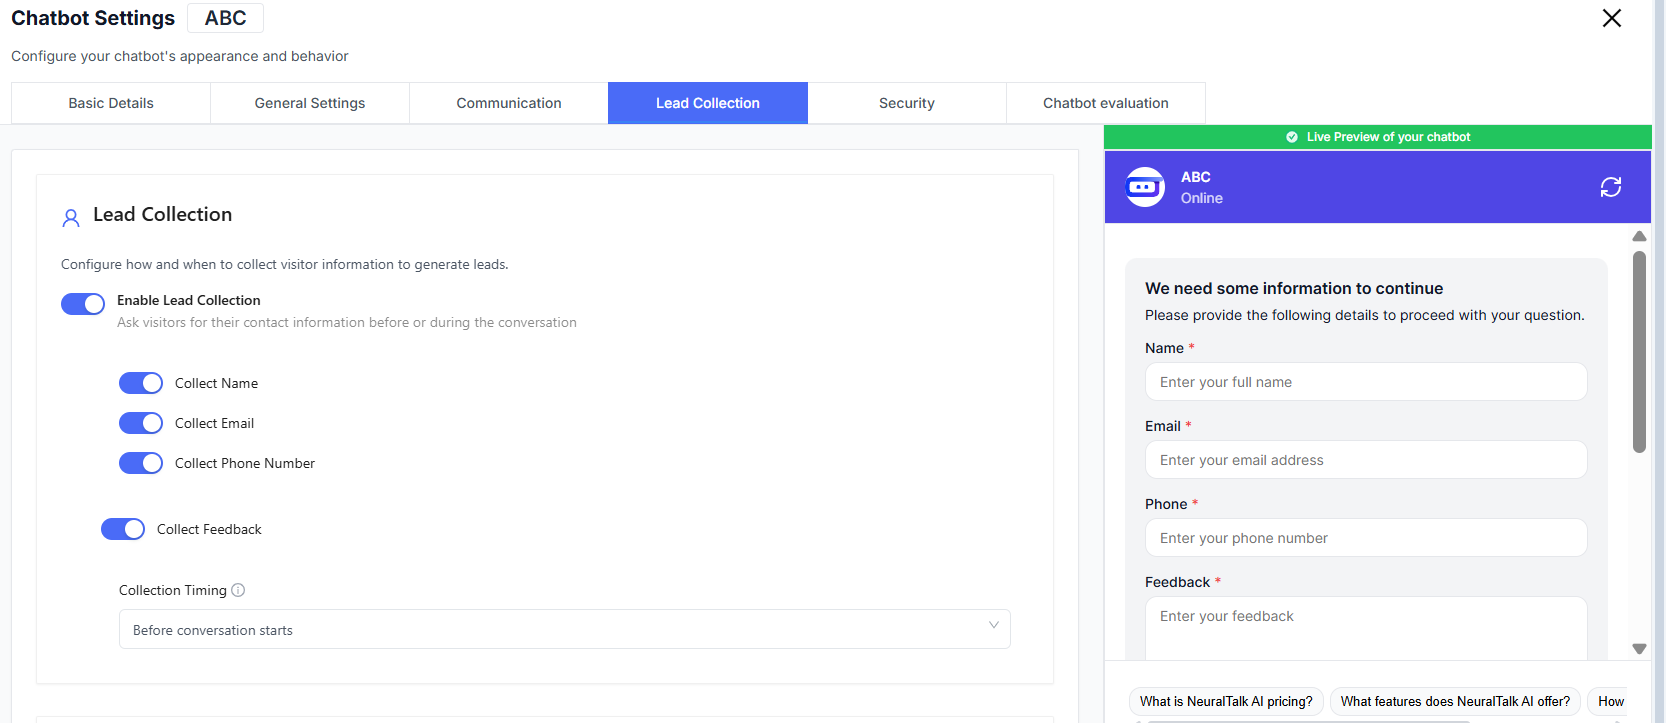
The **Lead Collection** feature lets your chatbot capture valuable visitor information such as name, email, phone number, and feedback.
You can choose when to ask for details and where the collected leads should be stored or sent.
This helps convert conversations into real opportunities for follow-ups, marketing, and sales.
## Accessing Lead Collection
* Log in to your dashboard
* Go to **Settings**
* Select **Chatbot Settings**
* Click on **Lead Collection**
* Enable lead collection
* Choose what information to collect and where it should go
## Lead Collection Controls
### Enable Lead Collection
Toggle lead collection to start asking visitors for their details.
### 🔔 Enable Lead Collection
* Ask visitors for their contact information
* Can be triggered **before** or **during** the conversation
### 👥 Generate More Leads
* Capture interested users for **follow-ups**
* Useful for **product demos** and **marketing campaigns**
## Information You Can Collect
Select the specific fields you want the chatbot to request.
### 🪪 Collect Name
* Identify who is interacting with your chatbot
### ✉️ Collect Email
* Great for **follow-ups**, newsletters, and onboarding emails
### 📞 Collect Phone Number
* Helpful for **sales callbacks** and high-priority leads
### 💬 Collect Feedback
* Gather insights about **user experience**
* Improve chatbot performance over time
> Only enable fields that are relevant to your workflow to avoid overwhelming users.
## Collection Timing
Decide **when** to request user information.
Ask users for details upfront — great for sales-driven chatbots.
> Future options may include asking **during conversation** based on triggers or actions.
## Lead Notifications
### Send Leads To
Choose where collected leads should go.
Leads are saved inside your chatbot’s conversation logs.
Some setups allow sending leads to CRM tools or email services (requires integrations).
> You can customize routing based on your workflow and sales pipelines.
## Important Notes
### ⚖️ Compliance Reminder
* Always follow **data protection and privacy regulations**
* Examples include **GDPR** or local equivalents
## Best Practices
* Clearly explain why you're asking for user details
* Keep forms short to increase completion rates
* Notify your team when new leads arrive
* Regularly export or sync leads to your CRM
* Respect consent and privacy requirements
 ## Lead Collection Controls
### Enable Lead Collection
Toggle lead collection to start asking visitors for their details.
### 🔔 Enable Lead Collection
* Ask visitors for their contact information
* Can be triggered **before** or **during** the conversation
### 👥 Generate More Leads
* Capture interested users for **follow-ups**
* Useful for **product demos** and **marketing campaigns**
## Information You Can Collect
Select the specific fields you want the chatbot to request.
### 🪪 Collect Name
* Identify who is interacting with your chatbot
### ✉️ Collect Email
* Great for **follow-ups**, newsletters, and onboarding emails
### 📞 Collect Phone Number
* Helpful for **sales callbacks** and high-priority leads
### 💬 Collect Feedback
* Gather insights about **user experience**
* Improve chatbot performance over time
> Only enable fields that are relevant to your workflow to avoid overwhelming users.
## Collection Timing
Decide **when** to request user information.
## Lead Collection Controls
### Enable Lead Collection
Toggle lead collection to start asking visitors for their details.
### 🔔 Enable Lead Collection
* Ask visitors for their contact information
* Can be triggered **before** or **during** the conversation
### 👥 Generate More Leads
* Capture interested users for **follow-ups**
* Useful for **product demos** and **marketing campaigns**
## Information You Can Collect
Select the specific fields you want the chatbot to request.
### 🪪 Collect Name
* Identify who is interacting with your chatbot
### ✉️ Collect Email
* Great for **follow-ups**, newsletters, and onboarding emails
### 📞 Collect Phone Number
* Helpful for **sales callbacks** and high-priority leads
### 💬 Collect Feedback
* Gather insights about **user experience**
* Improve chatbot performance over time
> Only enable fields that are relevant to your workflow to avoid overwhelming users.
## Collection Timing
Decide **when** to request user information.