> ## Documentation Index
> Fetch the complete documentation index at: https://docs.neuraltalk.ai/llms.txt
> Use this file to discover all available pages before exploring further.
# 🛍️ Shopify Integration
> Learn how to generate your Shopify Admin API Access Token — the key to securely connecting your store with external apps, automations, or integrations.
🎥 Refer to the setup video for a step-by-step visual guide:
## **⚙️ Prerequisites**
Before you begin, make sure you have:
* A **Shopify store** (any plan)
* Access to your **Shopify admin panel**
* Enable **Custom app development** (if first time)
## **🔧 Step 1: Enable Custom App Development**
To begin, allow custom app development for your store.
1. Log in to your **Shopify admin panel**
2. In the left sidebar, click on **Settings**
3. Under Settings, select **Apps and sales channels**
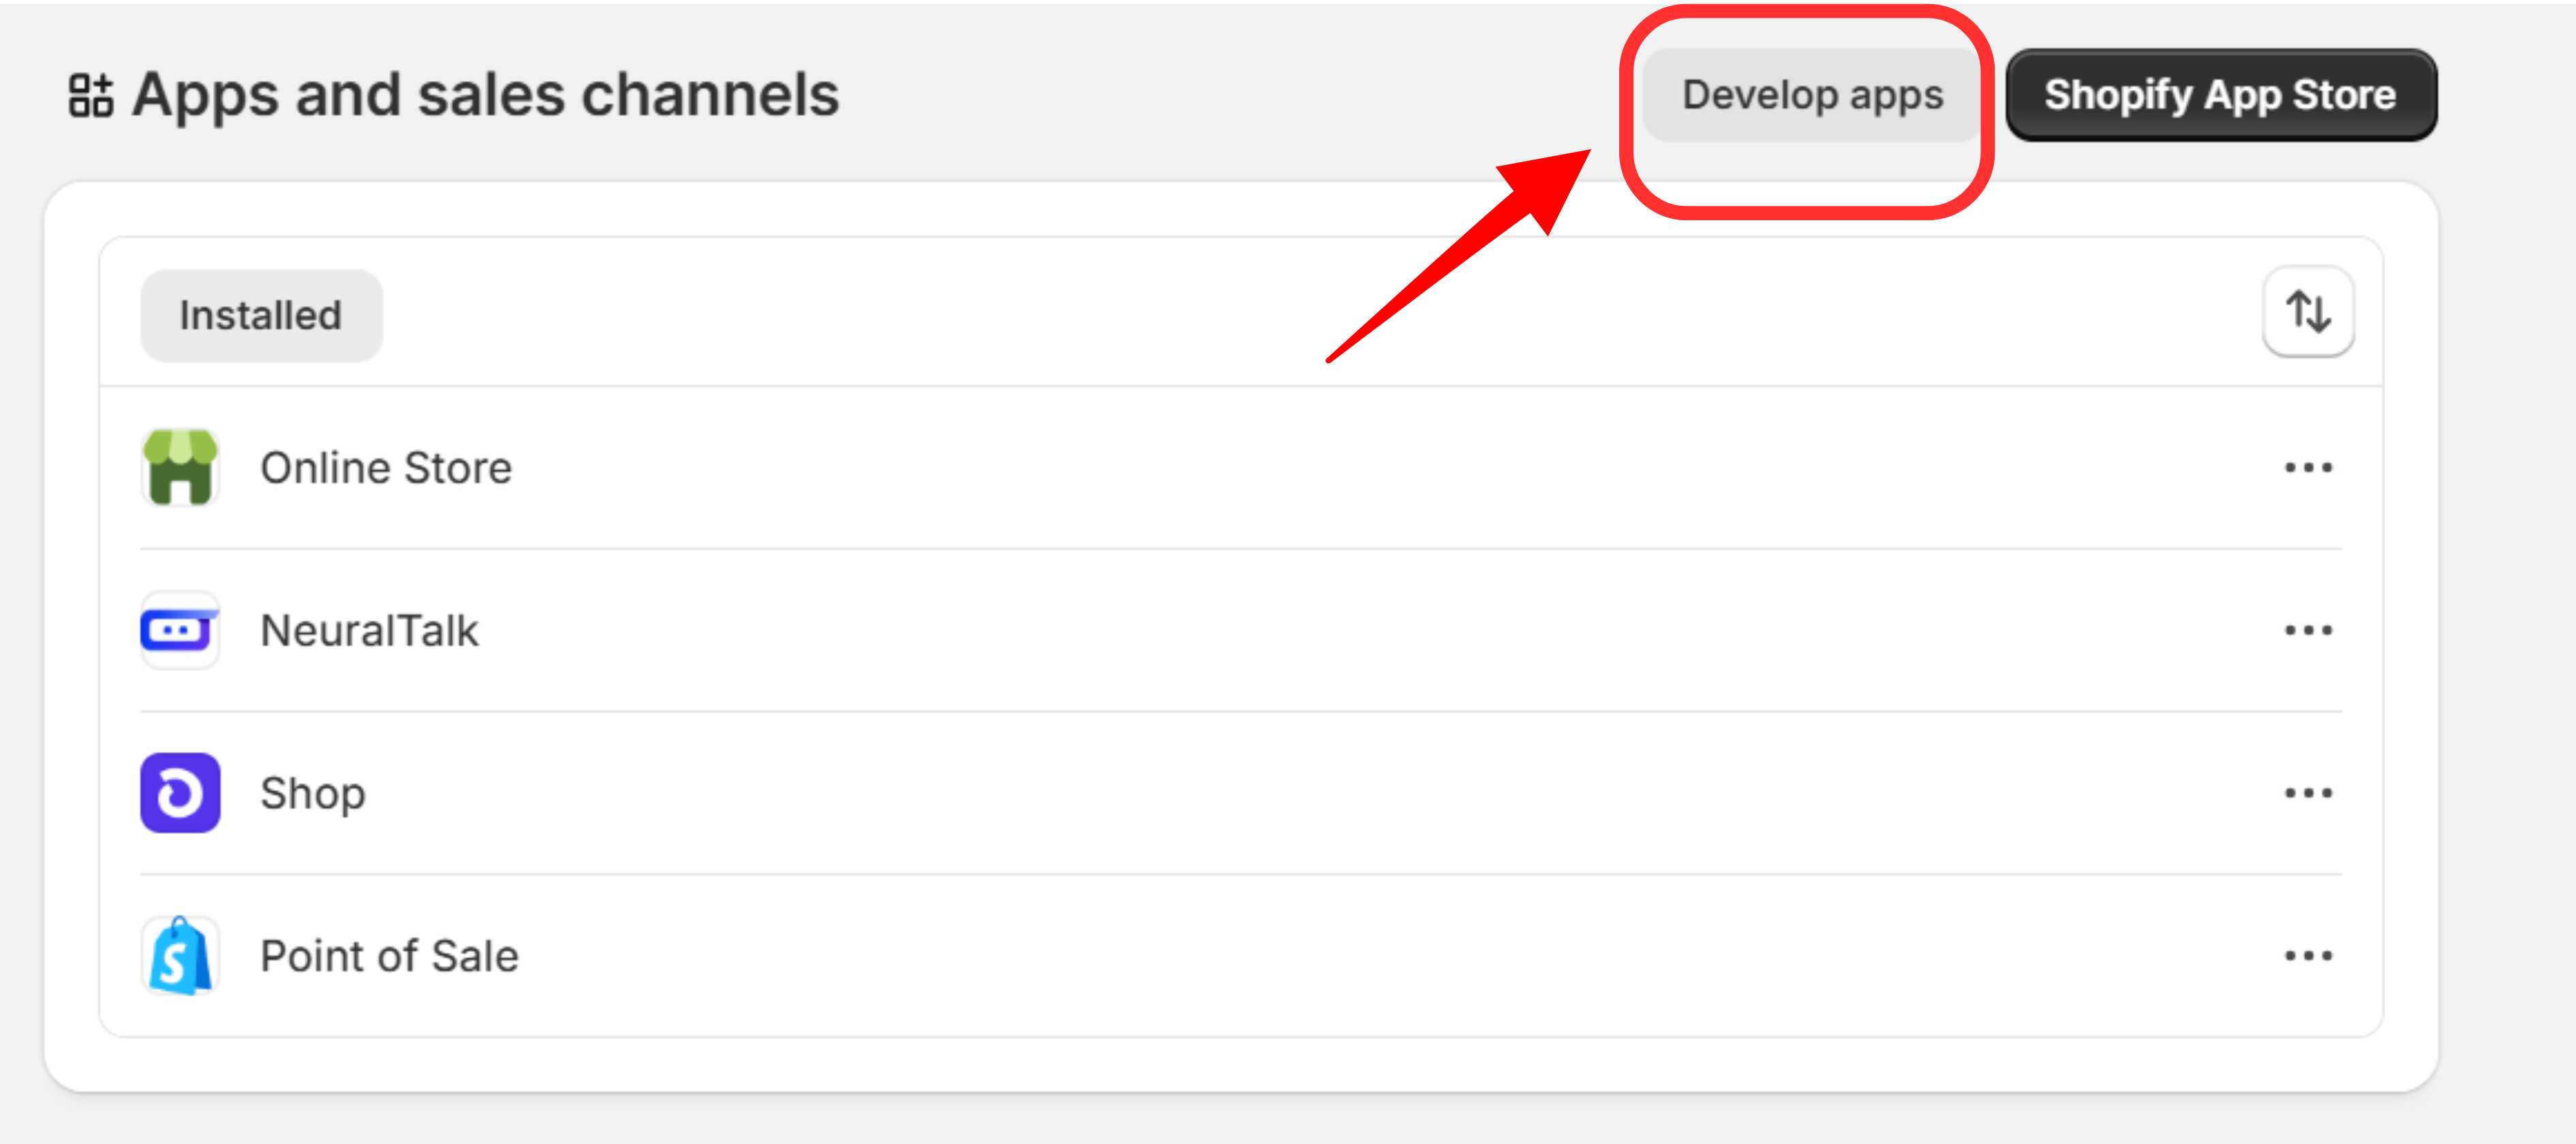
4. Click on **Develop apps** at the top-right corner of the page.
## **🧩 Step 2: Create a Custom App**
Once custom app development is enabled:
1. Click **Create an app** and give it a suitable name
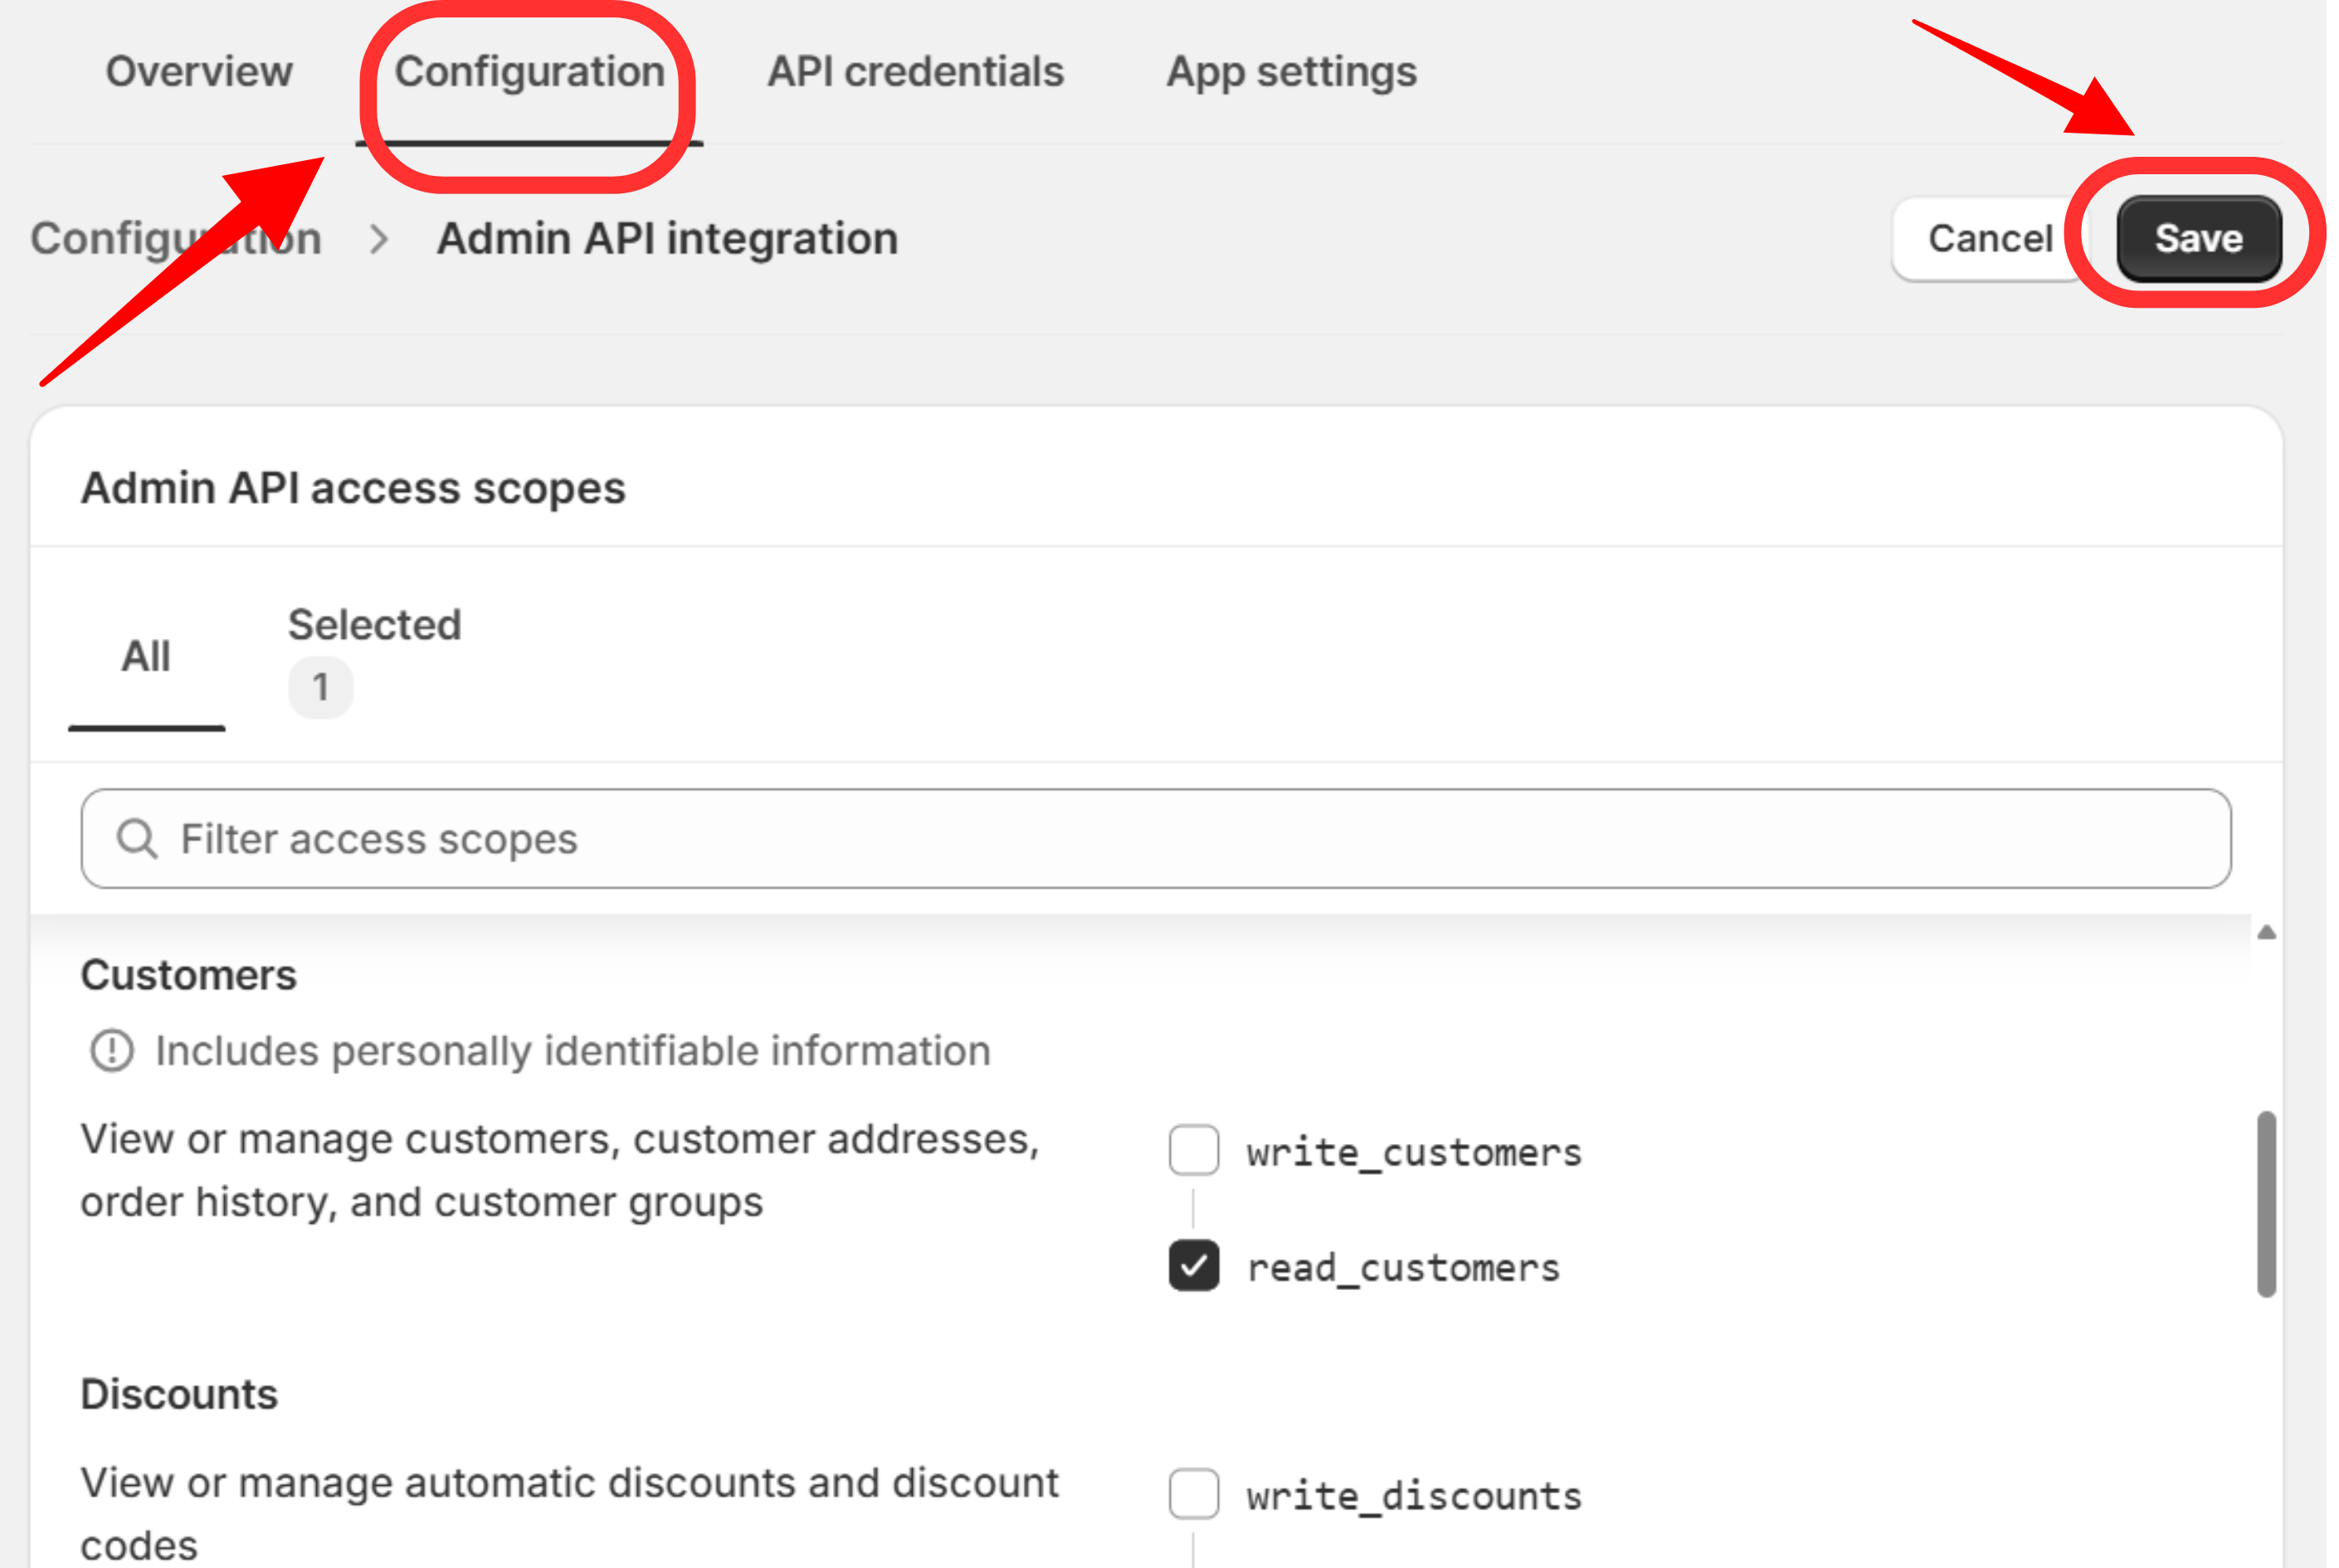
2. Go to the **Configuration** tab
3. Under **Admin API integration**, choose the required **API scopes**
* Examples: read\_products, write\_orders, read\_customers, read\_product\_listings, read\_product\_feeds, read\_orders, read\_payment\_terms
4. Click **Save** to apply your settings
## **🔐 Step 3: Generate Your Admin API Access Token**
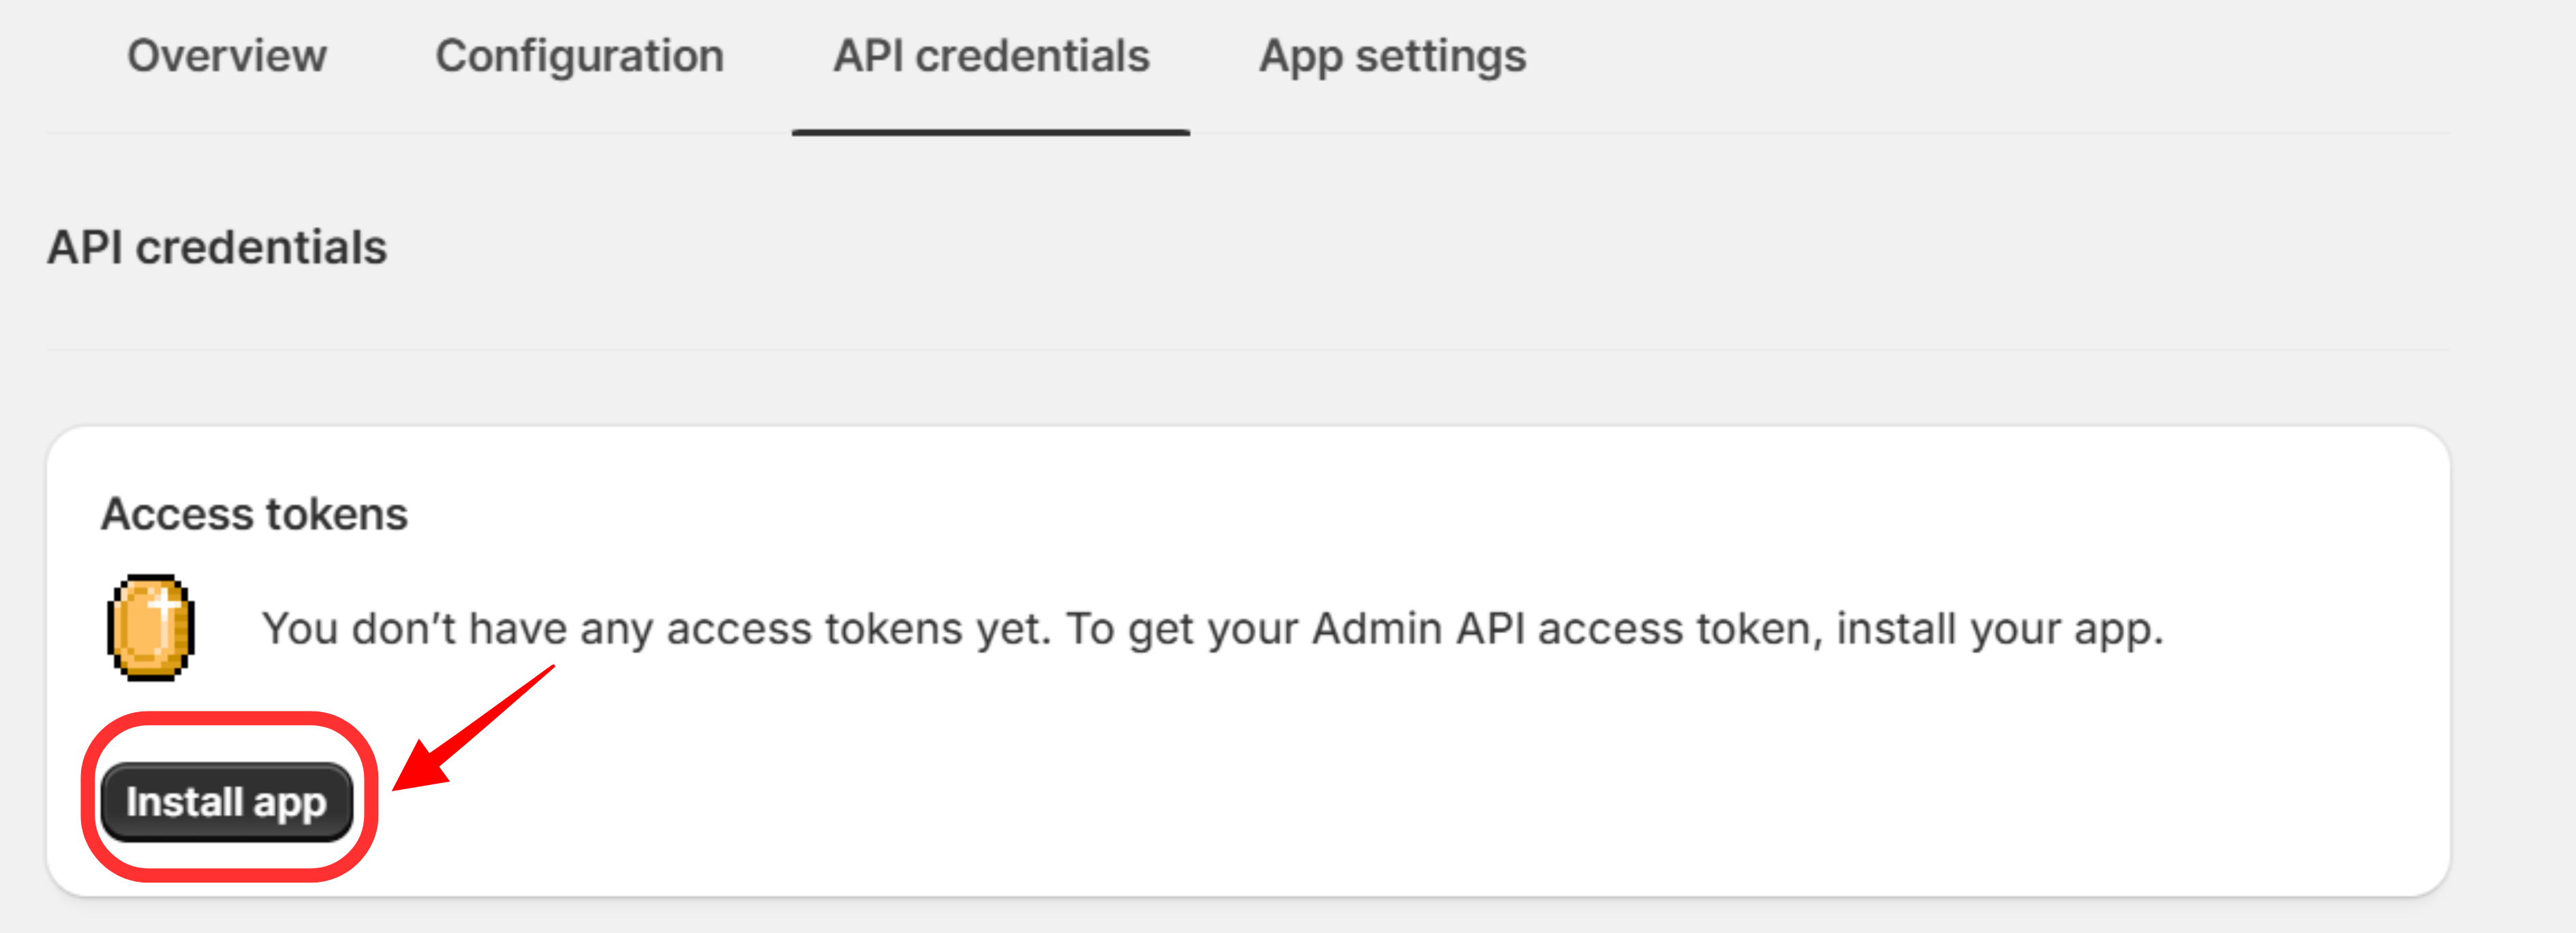
1. Navigate to the **API credentials** tab
2. Click **Install app** to activate it for your store
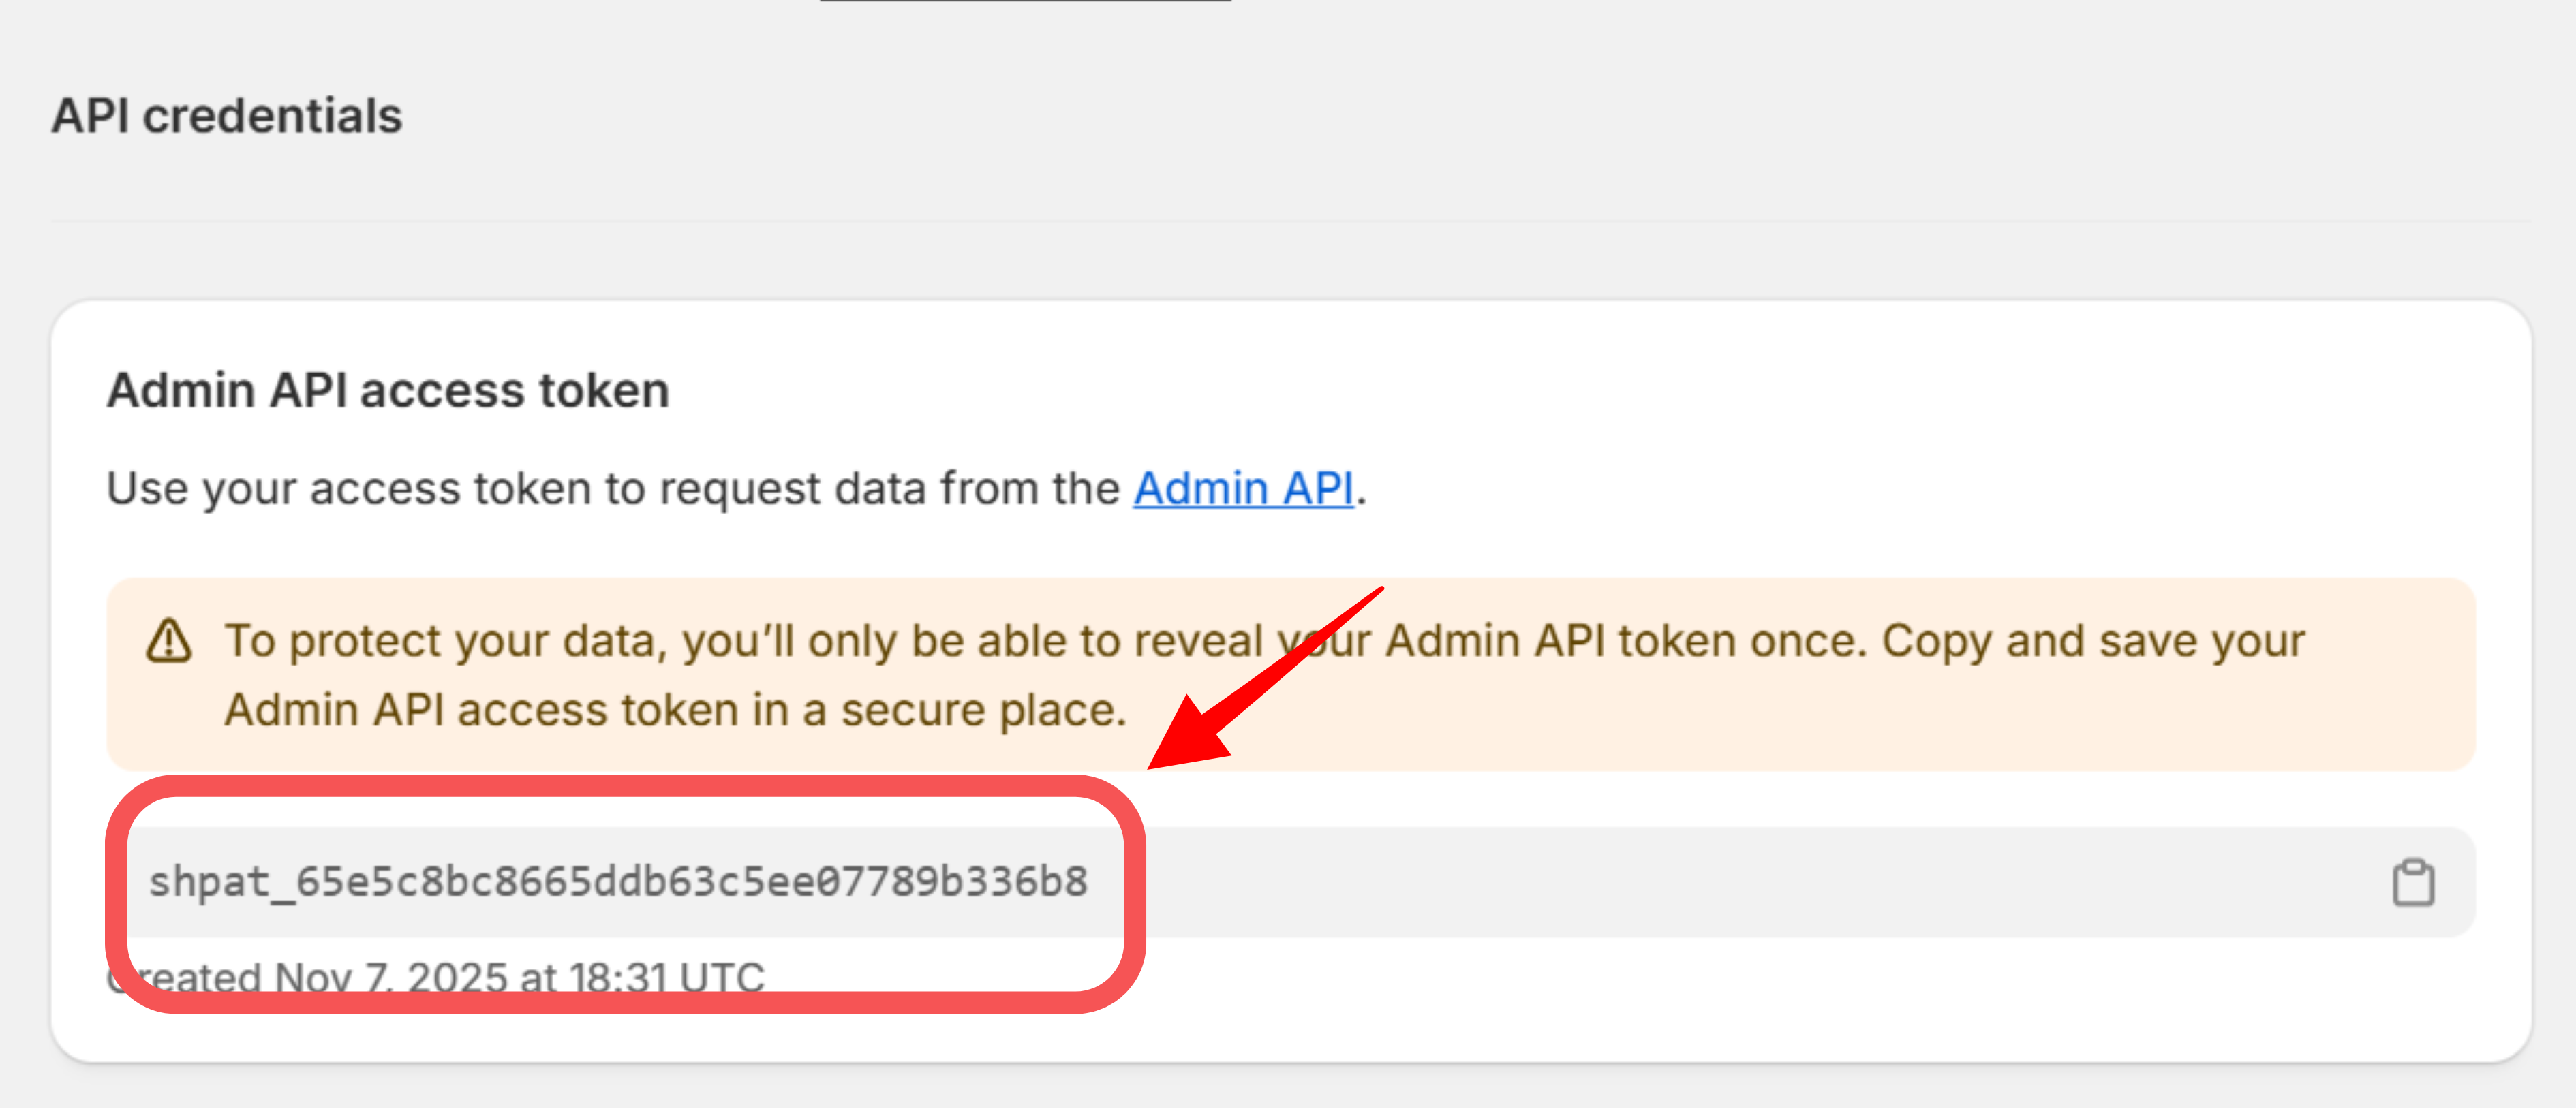
3. After installation, your **Admin API Access Token** will appear
4. **Copy and save it securely** — it will only be visible once
## **🔗 Step 4: Connect Your Shopify Store to NeuralTalk**
Once you’ve generated your **Admin API Access Token**, you can connect your Shopify store to your NeuralTalk dashboard.
1. Open your **NeuralTalk Dashboard**
2. Navigate to **Integrations → Shopify Integration**
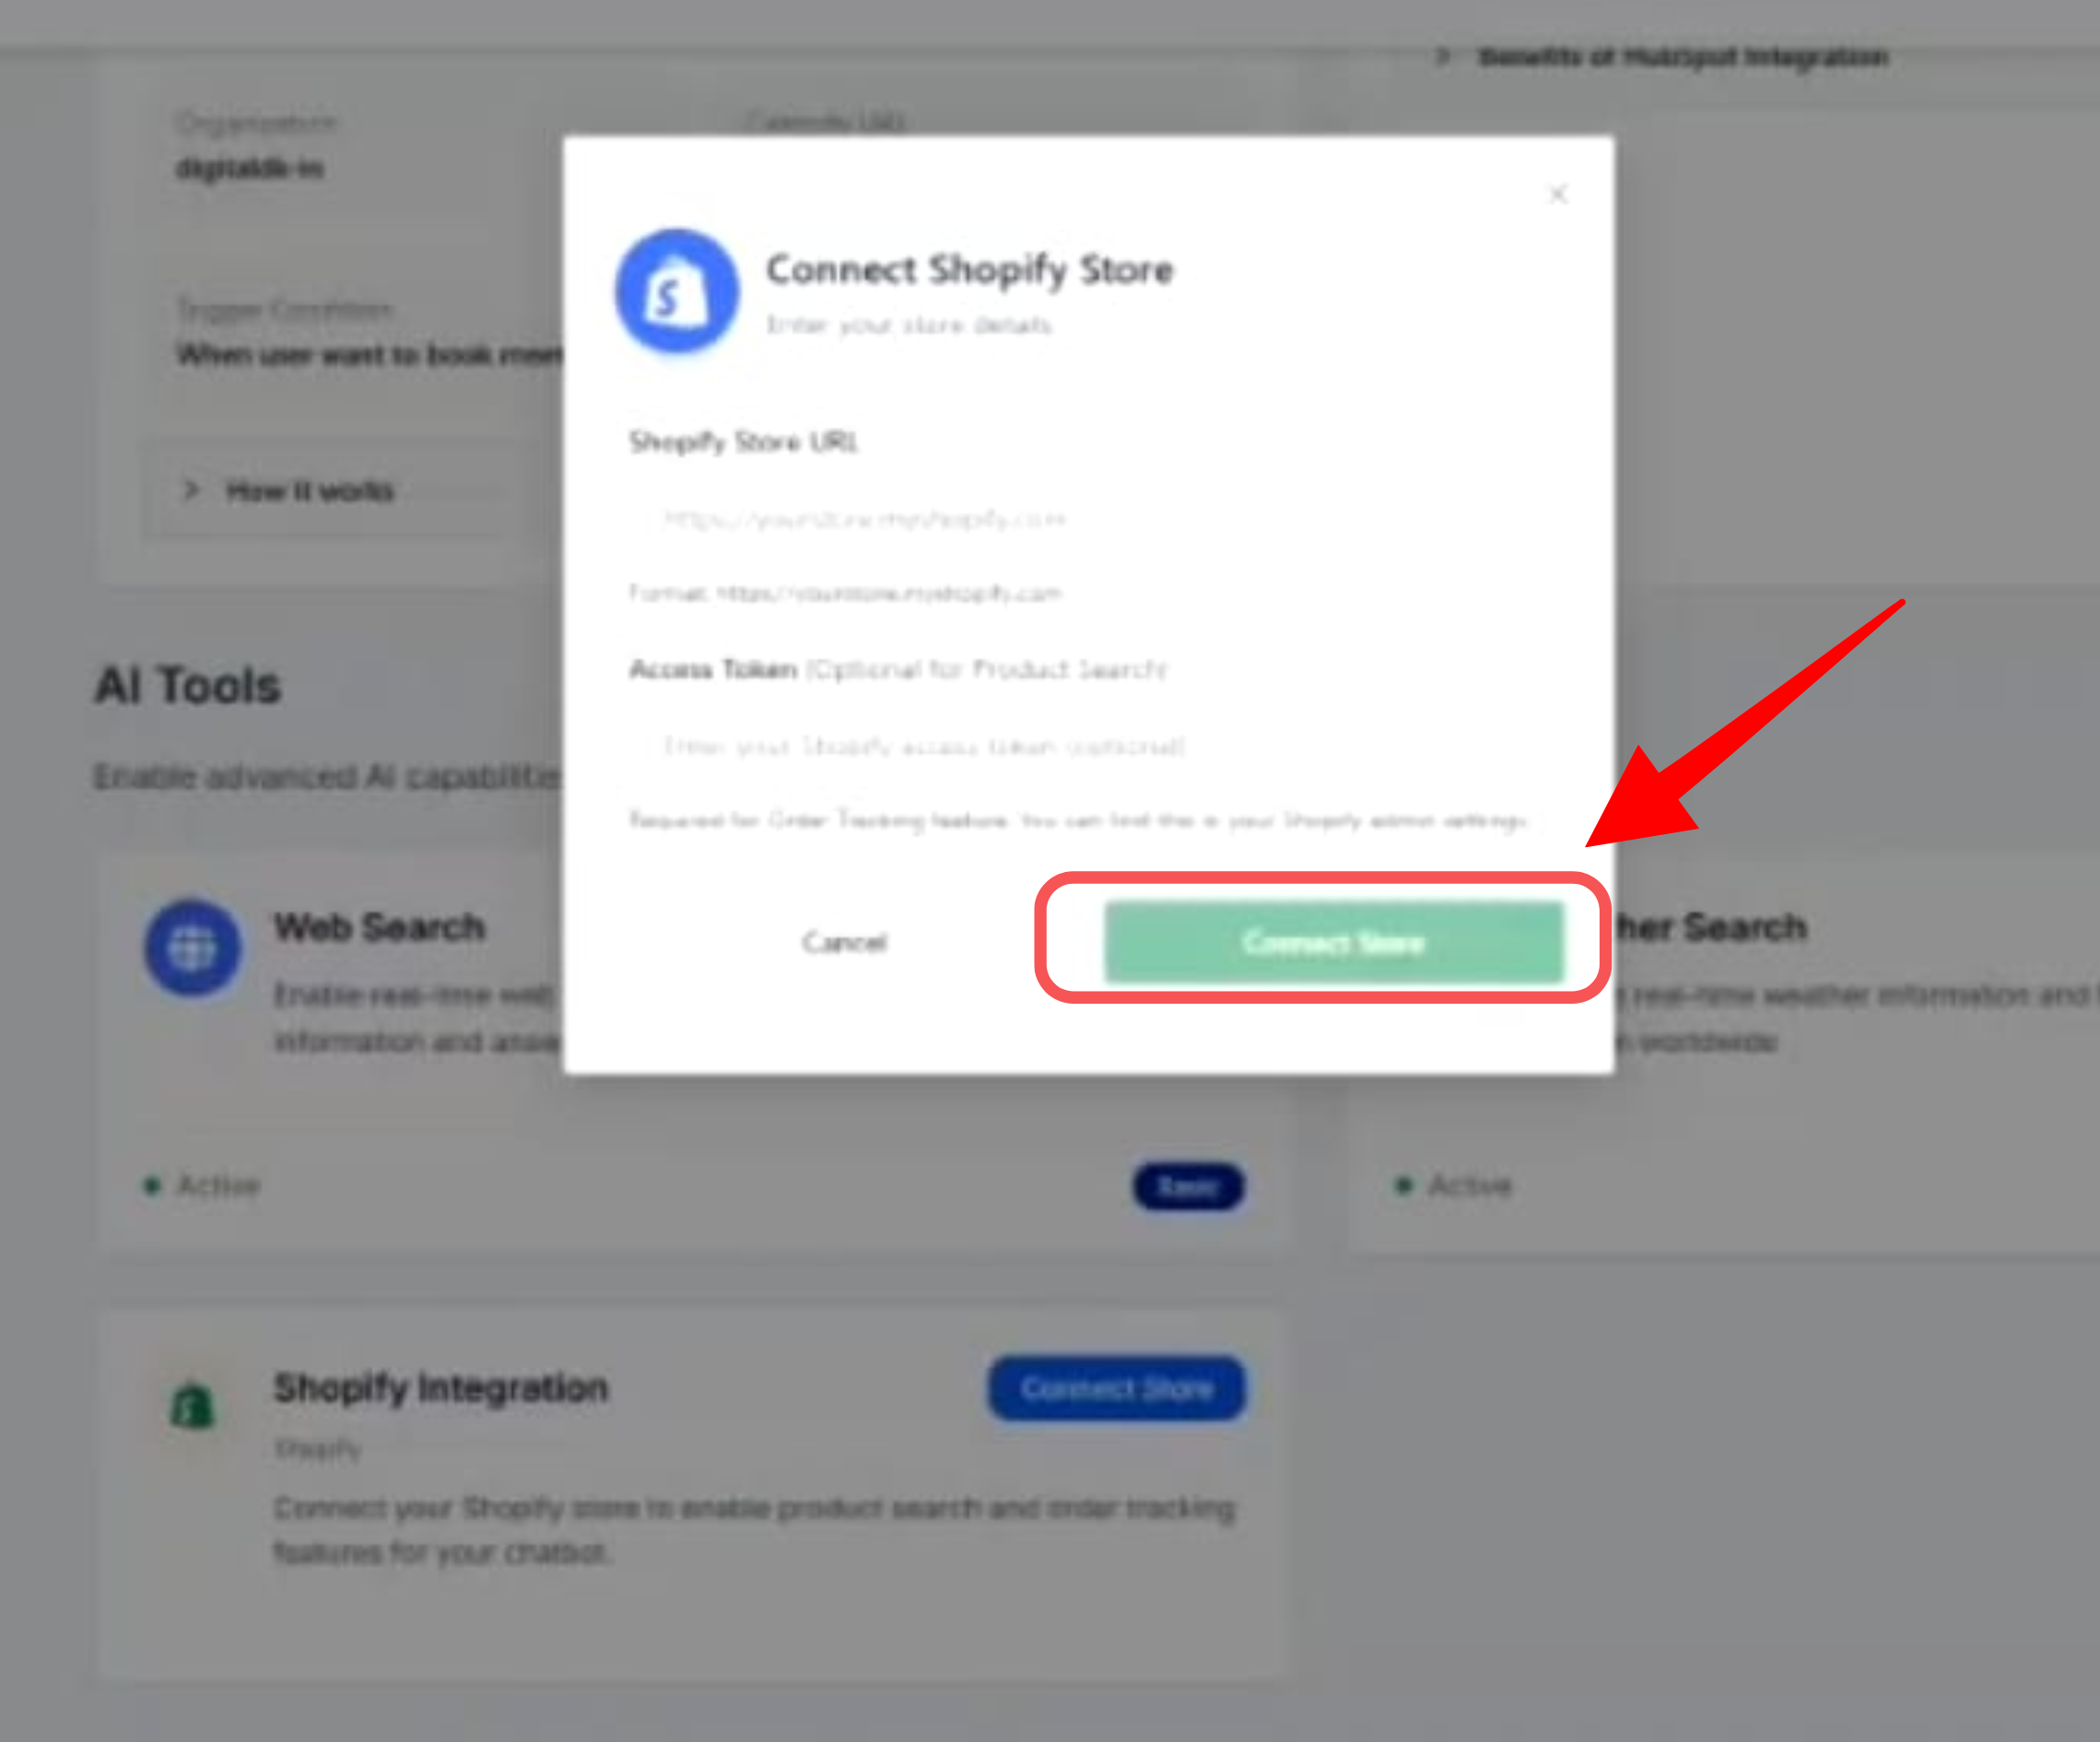
3. Click **Connect Store** to open the connection popup
4. In the popup window:
* Enter your **Shopify Store URL**
* Paste your **Admin API Access Token** into the **Access Token** field
5. Click **Connect Store** to complete the integration
✅ Your Shopify store is now securely linked with NeuralTalk! You can start enabling product search, order tracking, and AI-powered chat features instantly
## **💡 Best Practices**
* 🔒 **Keep your token confidential** – never expose it publicly or commit it to GitHub
* ⚙️ **Use environment variables** to store the token in your project safely
* 🎯 **Grant minimal permissions** – only select the scopes your app actually needs
* 🧾 **Rotate tokens periodically** for better security
## **🧰 Troubleshooting**
**Token Not Visible**
* Make sure the app is fully installed
* Ensure you have the necessary admin permissions
**Permission or Access Errors**
* Revisit the **Configuration** tab and verify selected API scopes
* Reinstall the app after updating permissions
## **🚀 Next Steps**
Once you have your **Admin API Access Token**, you can:
* Connect your store with third-party applications
* Automate product, order, and customer data sync
Integrate AI assistants, analytics tools, or custom dashboards
Need help with your Shopify integration? Contact our [support team](mailto:support@neuraltalk.ai) for personalized assistance. For quick resolution and community support, join our [Discord community](https://discord.com/invite/tHpggadDAk).
 ## **🧩 Step 2: Create a Custom App**
Once custom app development is enabled:
1. Click **Create an app** and give it a suitable name
2. Go to the **Configuration** tab
3. Under **Admin API integration**, choose the required **API scopes**
* Examples: read\_products, write\_orders, read\_customers, read\_product\_listings, read\_product\_feeds, read\_orders, read\_payment\_terms
4. Click **Save** to apply your settings
## **🧩 Step 2: Create a Custom App**
Once custom app development is enabled:
1. Click **Create an app** and give it a suitable name
2. Go to the **Configuration** tab
3. Under **Admin API integration**, choose the required **API scopes**
* Examples: read\_products, write\_orders, read\_customers, read\_product\_listings, read\_product\_feeds, read\_orders, read\_payment\_terms
4. Click **Save** to apply your settings
 ## **🔐 Step 3: Generate Your Admin API Access Token**
1. Navigate to the **API credentials** tab
2. Click **Install app** to activate it for your store
3. After installation, your **Admin API Access Token** will appear
4. **Copy and save it securely** — it will only be visible once
## **🔐 Step 3: Generate Your Admin API Access Token**
1. Navigate to the **API credentials** tab
2. Click **Install app** to activate it for your store
3. After installation, your **Admin API Access Token** will appear
4. **Copy and save it securely** — it will only be visible once
 ## **🔗 Step 4: Connect Your Shopify Store to NeuralTalk**
Once you’ve generated your **Admin API Access Token**, you can connect your Shopify store to your NeuralTalk dashboard.
1. Open your **NeuralTalk Dashboard**
2. Navigate to **Integrations → Shopify Integration**
3. Click **Connect Store** to open the connection popup
4. In the popup window:
* Enter your **Shopify Store URL**
* Paste your **Admin API Access Token** into the **Access Token** field
5. Click **Connect Store** to complete the integration
✅ Your Shopify store is now securely linked with NeuralTalk! You can start enabling product search, order tracking, and AI-powered chat features instantly
## **🔗 Step 4: Connect Your Shopify Store to NeuralTalk**
Once you’ve generated your **Admin API Access Token**, you can connect your Shopify store to your NeuralTalk dashboard.
1. Open your **NeuralTalk Dashboard**
2. Navigate to **Integrations → Shopify Integration**
3. Click **Connect Store** to open the connection popup
4. In the popup window:
* Enter your **Shopify Store URL**
* Paste your **Admin API Access Token** into the **Access Token** field
5. Click **Connect Store** to complete the integration
✅ Your Shopify store is now securely linked with NeuralTalk! You can start enabling product search, order tracking, and AI-powered chat features instantly
 ## **💡 Best Practices**
* 🔒 **Keep your token confidential** – never expose it publicly or commit it to GitHub
* ⚙️ **Use environment variables** to store the token in your project safely
* 🎯 **Grant minimal permissions** – only select the scopes your app actually needs
* 🧾 **Rotate tokens periodically** for better security
## **🧰 Troubleshooting**
**Token Not Visible**
* Make sure the app is fully installed
* Ensure you have the necessary admin permissions
**Permission or Access Errors**
* Revisit the **Configuration** tab and verify selected API scopes
* Reinstall the app after updating permissions
## **🚀 Next Steps**
Once you have your **Admin API Access Token**, you can:
* Connect your store with third-party applications
* Automate product, order, and customer data sync
Integrate AI assistants, analytics tools, or custom dashboards
## **💡 Best Practices**
* 🔒 **Keep your token confidential** – never expose it publicly or commit it to GitHub
* ⚙️ **Use environment variables** to store the token in your project safely
* 🎯 **Grant minimal permissions** – only select the scopes your app actually needs
* 🧾 **Rotate tokens periodically** for better security
## **🧰 Troubleshooting**
**Token Not Visible**
* Make sure the app is fully installed
* Ensure you have the necessary admin permissions
**Permission or Access Errors**
* Revisit the **Configuration** tab and verify selected API scopes
* Reinstall the app after updating permissions
## **🚀 Next Steps**
Once you have your **Admin API Access Token**, you can:
* Connect your store with third-party applications
* Automate product, order, and customer data sync
Integrate AI assistants, analytics tools, or custom dashboards